Showing posts with label pinterest. Show all posts

Thursday, November 10, 2011

Windows 2.0

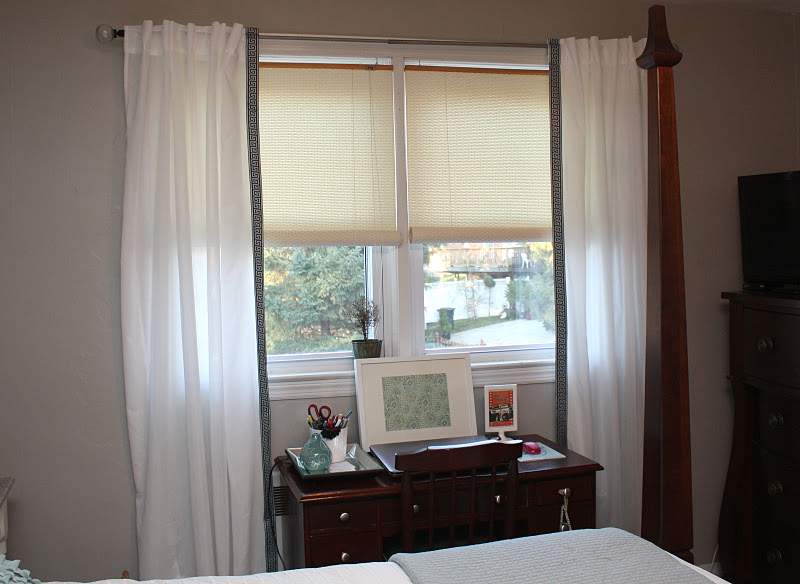
As I mentioned a few days ago, on my master bedroom update post, the curtains were a partially completed project. I bought them, I unpacked them, and then I hung them with no ironing or hemming, knowing that an upgrade was going to happen immediately.

All wrinkly and blah.
Back when I was pinning things like a crazy person for changing up things in the dining room, I kept pinning photos of lovely neutral curtains with a little trim along one or both sides of the panels.


Before I started searching the internet for trim, I thought I'd check the local Joann's Fabric trim section especially since I had a 40% off coupon. I was thrilled to find that not only did they have a nice wide greek key-patterned trim, but it was in colors that would work in my new bedroom!

A silver-y aqua greek key on a chocolate brown background.

I needed 6 yards, so with the coupon, I got the trim for $23. I grabbed a little Stitch Witchery too (iron-on fusible webbing tape that you use to bond two pieces of fabric together), with a plan to iron that gorgeousness straight onto the curtains I bought at Ikea.

First, I had to hem the curtains. I wanted them a little long and to pool on the floor, so I just folded up the bottom of the panels about half an inch or so. I used the hemming without sewing (unless you want to) method, also outlined here. And here. The curtains from Ikea come pre-packaged with enough Stitch Witchery tape to hem each panel.


To attach the greek-key trim, I just ran two strips of the fusible tape (since I couldn't find the tape in a width that matched the width of the trim) along the inside edge of the panel.


Then, working in about 2-foot sections at a time, I held the trim in place while I slowly applied heat with my iron until it bonded. The trim is woven and a little thicker than ribbon or cotton fabric, so it took a few passes with the iron and a little pressure to get it to stick to the curtain. For the ends, I just let about two inches of the trim hang off the top and bottom of the panel until I was done applying the trim along the side of the panel. Once I was done with that, I turned the panel over, folding over the trim, and ironing to the back side using the fusible tape just as I did along the front.


It took about an hour and a half to do both panels, but that includes hemming the bottom and then ironing the curtains after the trim was attached. It was worth it! For about $40 I have these:


So dreamy...


Tuesday, November 8, 2011

Whoopie!

Whoopie pies are the new black. I'm pretty sure of this. They may even be the new cupcake. They're everywhere and I'm pretty sure they can't be stopped. I've never made them before and thought maybe I should. I mean, we are pretty close to Lancaster, PA, and those Amish folks do claim the whoopie pie as their own.

Thanks to the awesomeness that is Pinterest, I found a link for Pumpkin and Maple Cream Cheese Whoopie Pies recipe here.

I must say, that not only did they taste fantastic, they turned out much prettier than I ever imagined!!!

I followed the recipe this time with only a few minor changes. I doubled the amount of spices (the cinnamon and ginger) and was pleased with the result. The cookies would have been bland (to me) had I not made that adjustment. My readers who tasted them can weigh in on that in the comment section!


I used my small cookie scoop to put the dough on the pans. I knew using this method was the only way I stood a chance of getting cookies the same size. I just hoped it would also result in cookies with a rounded shape. Also, whenever I bake cookies, I ALWAYS use my Pampered Chef baking stones. ALWAYS. If I had Silpat Cookie Sheet Liners I'd use those, but with the issues I have with my oven, I can't use a straight cookie sheet.


It worked!

Once I saw that the cookies looked perfect, I wanted to make sure I didn't make the filling look messy. So before I squished the two cookies together with the filling in the middle, I sort of formed it onto one cookie and smoothed the sides a bit. Then pressed the two together so the filling then just spread out in the formed shape.

Ta da!

I would absolutely make these again!
In other, non-whoopie pie related news, I thought I'd share a little cinematic masterpiece created by my friend, Candy's husband, who is obviously a skilled filmmaker.

I bet you'll never guess which phone is me!


Thursday, November 3, 2011

Master Bedroom Makeover

So, it's taken a month or two but I've finally (almost) finished updating the master bedroom. We've lived in the house since 2004 and I never painted our bedroom. The color wasn't horrible, sort of a yellowy-beige, but it was kind of dull and boring. Then, thanks to our neighbors hacking down a huge maple tree in front of our house, the blazing afternoon sun began bleaching out my curtains and the coverlet on the bed. I bought them at Pottery Barn a few years ago and still love them, but I am kind of ready for a change.

BEFORE

I have pretty decent bedroom furniture. It's only a few years old. 
I have lots of decorative items that I can work into the new plan. My lamps are neutral. The art on the walls is neutral. Unfortunately, despite the small size of my room (and the lack of storage anywhere else in my house for ANYTHING), all this furniture has to stay where it is. It's an insane amount of furniture for a small space.

That bookcase on the left is here temporarily, but that may be "temporary" for 6 months to a year, not one week sort of temporary. I plan to paint it and move it into my son's room.
Those funny hanging things at the top of the photo are the ceiling fan pulls (I should have cropped those out of the photo!).
Until I can get down to NC and scour the furniture outlets, this white marble topped table is my nightstand. I need to find one to go with the rest of the bedroom furniture (Broyhill's Charlestowne line...which is no longer in production).  It was a table I had down in the basement, that happened to be same height as the other nightstand.
INSPIRATION

I started mulling over color schemes back in August and pinned some lovely bedroom inspiration over at Pinterest. I noticed that most of the rooms I liked had grey walls. So thinking grey and knowing that I have entire room of dark furniture, along with little money to do anything along the lines of a total re-do, I started coming up with ideas to use things that I already have. Then lo and behold I received a Ballard Designs  Catalog in the mail about a month ago and saw these:

Lots of grey and dark browns. Not what you expect to be paired with gray. Also a little white. I like the addition of the terra cotta/rust color but I kind of have that going on downstairs already. 
Another good mix of unsuspecting neutrals with a pop of color.
But it was this color scheme that caught my eye, because I knew I could make it happen on a budget (more on that here).


I also noticed similar color palates in Crate & Barrel's most recent catalog:


So here is where I went with all of this:

AFTER


I painted the walls Graceful Gray (Behr paint). It looks a little darker here than it is in real life. In person it looks more like the gray shown on the walls in the Ballard Designs catalog pages above (they obviously have a much better staff photographer).


I found these pillows at HomeGoods. The front pillow has a pretty mix of gray and light aqua. The two rectangular pillows are a sage velvet. I purchased the white duvet and cover at Ikea (Alvine Stra). I already had the sage pillowcases and the aqua throw I used on the end of the bed.

I painted the metal wall hanging, that was off-white and hanging above the bed in the "before"
photos, Oil Rubbed Bronze.  I hung it above the dresser and then placed
the Anthropologie-inspired piece I made a few weeks ago in front of it. 
Nothing new to report here. I framed a piece of Amy Butler fabric in a white Ikea frame (something I already had) to the desk for a little more color. Please ignore wrinkly curtains, those will be remedied soon.


So, yeah, that ugly bookcase is still there. Something is getting ready to happen to make it less disgusting. I'm not sure what just yet, but it can't stay this way much longer. 
I purchased these white curtains at Ikea. I would post a link to them but I can't seem to find these on the website. They're plain white and it was $14.99 for both. 
I spray painted my existing curtain rods Silver Nickel Satin, then popped off the old finials and replaced those with modern clear glass finials I also found at Ikea ($5.99).
Something has to happen with this thing. Do I upgrade the fan, like I did in the kitchen? It's nice to have a fan in my room in the summer. Or do I get a really pretty light fixture and just sweat in the summer?
So there you have it! I have a few more projects to do in order to wrap this thing up. I need something to hang over the bed, and have been working on some ideas for that. I also need to upgrade the curtains a bit (the plans are already in the works for that to happen this weekend). Finally, I need to deal with the issues of the ceiling fan and that bookcase. All in all, I think I probably spent about $200 or so, which isn't bad at all for changing up an entire room!

Wednesday, October 12, 2011

Velvet pumpkins


I thought this project would make a perfect fall-inspired Pinterest project for the Pinterest Challenge on Young House Love this week!

Check out these really cute velvet pumpkins with real pumpkin stems. Are they cute or what? I was inspired by similar pumpkins I saw at Terrain last weekend and decided that instead of blowing $40+ on one small one, I could probably make myself an entire velvet pumpkin patch for less than $20.


These are the ones that caught my eye at Terrain. They're beautiful. And expensive. They only sell the small one online. The large ones in the store were running about twice that price.


So, I did a little exploring online when I got home. Check out the gorgeous color combos I found on Pinterest!

Hot Skwash
Hot Skwash

Hot Skwash

Plush Pumpkin
I found this tutorial via a search on Pinterest.  This tutorial is very close to the steps I followed (although read it AFTER I made my pumpkins). My only changes, to either tutorial (because the cutting and sewing steps are the same), is that I filled my pumpkins about half full with rice (I wanted them to be very stable) and then added polyfill, and that I glued the pumpkin stem onto the pumpkin. I didn't stick it inside the opening in the top, like the first tutorial. Instead, I glued it straight onto the fabric as described in the second tutorial. I went to Joann's Fabric & Crafts at lunch one day. They didn't have silk velvet, like used to make the ones in the photos above. They did have TONS of colors in crushed velvet (which I'm not a fan of, but since I had no other option I just went with it). I chose a black and light grey because they'd go well with my Halloween decorations and I wanted to do something other than an orange pumpkin. Also, I knew I wanted to make some in non-traditional colors to use in my dining room, but I thought I'd give a black and grey one a try to see how they look out of the crushed velvet.

I just got a half a yard of the crushed velvet in each color ($3.00 in fabric total). A bag of rice (about $1.50). I had polyfill already at home in craft supplies.

Getting the stems (if you want more than one) seems to be the most difficult part of this entire project. Look what happened to my Kate Spade purse when I went to the pumpkin patch!

I am probably the only woman in history to fill her Kate Spade bag with pumpkin stems. I just walked around the pumpkin patch and picked them up off the ground. Yay free stuff!
If you can't find ones laying around your local garden or pumpkin patch, then you're going to have to buy pumpkins and murder them for their stems. Luckily I've been able to find very inexpensive victims at the local farmers market for only $1. I bought a few and removed the stems and left the pumpkins in the backyard for the squirrels.
I bought a cheap pumpkin and hacked off the stem. Grey stems are best because they look better and they're much easier to get off the pumpkin. I just cut out a square around the stem, popped it out of the pumpkin and then trimmed away the orange. This is much easier on a grey, or dried stem, than it was with this "green" one, but I had to work with what I could acquire on my lunch break!
At home, I just cut a piece of the black fabric into a 20" x 20" square (to make about a 10" pumpkin), and then folded it into quarters to cut a rough circle. 
I gathered and stitched up the circle, as described in the tutorials I mentioned above. Be sure to leave the needle and thread still attached. Then I filled the pumpkin half way with rice. Like I mentioned, I wanted it to be stable and not like a cotton filled fabric ball. 
After the rice, I added polyfill and then pulled the opening closed (with the the needle and thread that were still attached from gathering the edges) and tied it off. Because of the thickness of the bunched fabric, it didn't close all the way, so I ran stitches across the opening until it was pulled close. I chose to go this route because I noticed that some of the Plush Pumpkin and Hot Skwash pumpkins seem to have a "tufted" shape about them and I wanted that same look. I also suggest using button thread to make the gathers and then to pull it closed. Using regular thin thread may not be the best idea when you have thick fabric and you're pulling against it.
Closed but a little polyfill was sticking through.
The finished product! I made one large black 10" pumpkin and two small 4" pumpkins. I just hot glued the stems onto the fabric. They seem to be holding just fine. I'm just careful not to pick them up by the stem.


The orange pumpkin is actually store bought. A friend who knew I was making these saw it at a local store and bought it for me. It's amazing how much the stem on that thing looks real (it's resin)! And it was definitely cheaper than the ones at Terrain too.

I think I'll make a bunch in various neutrals for the dining room.
I started with six. I still need a few more. I'll get to those later this week.